CVE-2026-48282 (CVSS 10) is a critical path traversal vulnerability [CWE-22] in Adobe ColdFusion. According to Adobe’s Security Bulletin [APSB26-68], the issue affects ColdFusion 2025 Update 9 and earlier, and ColdFusion 2023 Update 20 and earlier. Exploitation is network-based, which increases the risk to exposed ColdFusion instances, and exploitation does not require authentication. A successful attack […]
This week&aposs updates center on expanded board support, Rockchip and Qualcomm platform maturation, and build system refinements.
New hardware coverage grew across multiple SoC families, with the Lubancat 5IO (RK3588), KickPi K3B, Mellow Fly C5 3D printer board, and community support for the Orange Pi Zero 3W (Allwinner A733). The Arduino UNO Q advanced to mainline 7.1 on the edge kernel and gained desktop hardware acceleration via Mesa pinned to Trixie backports, while the BeagleY-AI received ISP, IMX219, and VPAC patches. Companion fixes addressed NVMe/SD boot conflicts on the NanoPi M6, Ethernet on the BigTreeTech CB1, and AIC8800 UART Bluetooth on Orange Pi A733 hardware.
Rockchip work concentrated on the YY3588 and CM3588-NAS platforms, with device tree cleanups, a corrected HDMI-RX detect GPIO, and quieter DRM logging for dw-hdmi-qp and dw-dp bridges. Newer bl31, bl32, and DDR blobs landed for RK3576, and stale U-Boot was refreshed fleet-wide to resolve a SWIG build break. On the Qualcomm side, SC8280XP was refactored from a board to a family configuration, and the Radxa Dragon Q8B gained UFS image provisioning, QDL flashing support via the imager, and a mainline 7.1 edge target for the Q6A variant.
Build and tooling improvements included a new show-extensions CLI command, a switch from the adduser suite to useradd/groupadd during first login, non-interactive Dpkg conffile handling in chroot, and clang compatibility fixes for carried Rockchip64 patches and SpacemiT RTL8852BS builds. The mainline kernel target advanced to 7.2-rc2, and MGLRU was enabled across sunxi, sunxi64, and sun60iw2 kernel configurations.
As previously announced, Qubes OS User Survey 2026 will close on 2026-07-13. If you still wish to take the survey and haven’t completed it yet, please do so now.
Whether you’re a long-time Qubes user or haven’t even installed it yet, we want to hear about your experiences and about what matters to you. Help us make Qubes the best reasonably secure operating system it can be. If you’ve ever wanted to influence the development of Qubes, now is your chance. Make your voice heard!
Purism installed and recorded the test-harness at two DOE/NNSA facilities traversing between Las Vegas Nevada and Albuquerque New Mexico. This is a first-known live installation of PQC Encryptors between two long-haul sites showcasing 10Gbps line-rate speeds with negligible latency and maximum throughput compared to cleartext.
With the recent launch of the Librem 16, I'm excited. Clearly I'm excited to share this product with you, but that's just the beginning. I'm excited for the future of technology.
The true impact that cyber security aware AI will have on the global threat landscape remains to be seen. By some reports, the CVE output for software made by major vendors is on the rise. This June 2026 threat report only scratches the surface of the major cyber security threats from this month. The month […]
On June 3, 2026, the European Commission proposed the Cloud and AI Development Act (CADA)—the centerpiece of its new Tech Sovereignty Package. At its core: a four-tier model that public contracting authorities will use in the future to assess how sovereign a cloud provider truly is—not just where the data is located, but who owns […]
Learn more about deepin on DistroWatch: https://distrowatch.com/table.php?distribution=deepin Dear deepin Community Members, To further optimize the user experience of the deepin 25 system and enhance its stability, the deepin 25.2.0 image is now officially released. This update focuses on improving Treeland stability and usability, file management and search experience, and DDE interaction and stability. It refines multiple high-frequency usage scenarios, fixes numerous known issues, and significantly improves system smoothness and reliability. deepin 25.2.0 Highlights at a Glance Treeland Desktop Environment Upgrade: Treeland stability and usability have been significantly improved, with over 20 fixes for stability and high-frequency interaction issues. It also ...Read more
Learn more about deepin on DistroWatch: https://distrowatch.com/table.php?distribution=deepin Dear deepin Community Members, To further optimize the user experience of the deepin 25 system and enhance its stability, the deepin 25.2.0 image is now officially released. This update focuses on improving Treeland stability and usability, file management and search experience, and DDE interaction and stability. It refines multiple high-frequency usage scenarios, fixes numerous known issues, and significantly improves system smoothness and reliability. I. Feature Updates 1. Treeland Treeland stability has been significantly improved, with over 20 stability fixes, focusing on abnormal behaviors during login, logout, multitasking view, window management, focus switching, and more; ...Read more
For the first time, attackers are exploiting unpatched vulnerabilities more often than they’re stealing credentials. According to Verizon’s 2026 Data Breach Investigations Report, vulnerability exploitation now accounts for 31% of breaches, ahead of credential theft at 13%. And the gap is moving in the wrong direction for defenders: the median time to fully patch a […]
This week&aposs cycle emphasizes broad U-Boot modernization, new board and SoC enablement, and kernel and wireless driver consolidation.
A large-scale U-Boot bump moves sunxi 32-bit and 64-bit targets from v2024.01 to v2026.07-rc4, with follow-on updates for self-pinned H616/H618 boards (Zero2W, Zero3, Longan Pi 3H), Mixtile Edge2, NanoPi R5S (now patch-less), and the Youyeetoo YY3588 switching to mainline v2026.04. The imx6 line (UDOO, Cubox-i) was modernized to U-Boot v2026.07 with legacy 6.12, current 6.18, and edge 7.1 kernels. Related toolchain work fixes ODROID-C1, ODROID-XU4, Recore, and X96Q builds under Trixie&aposs GCC 14, and resolves errexit failures on Rockchip SPI boards.
Platform expansion introduces community support for the Allwinner A733-based Radxa Cubie A7Z and Orange Pi Zero 3W, Rockchip Graperain G3568 v2, and Anbernic RG Vita Pro and Lubancat-5IO image entries. BeagleY-AI gained USB, PCIe, ISP + IMX219, and VPAC patches on the vendor kernel, alongside GPU acceleration fixes for TI K3 targets and TI Wave5 VPU firmware. Rockchip RV1106 support was split into distinct RV1103G and RV1103B families, and new SPI/NVMe boot and Maskrom recovery paths were added.
On the kernel and driver side, sunxi received an H3/H5 DVFS RCU-stall fix, MMC/I2C PM deadlock resolution, MGLRU enablement, and LTE modem USB serial support. Meson64 gained a GPIO pinctrl cansleep series and v7.2-rc1 via bleedingedge, while SpacemiT K1 was updated to linux-7.2.y. The RTL8189ES, RTL8189FS, and RTL8192EU wireless drivers were migrated to dedicated forks with 7.2 compatibility and patch cleanup, and an RTW88 SDIO interrupt storm was addressed. User-visible improvements include swapfile creation fixes, useradd-based first-login provisioning, and video-group access to Rockchip MPP codec devices.
Most digital transformation conversations still revolve around the same two topics: moving to the cloud, and adopting AI. Almost nobody talks about what’s underneath: the infrastructure that has to actually hold the weight of both.
That gap was on display at a recent Spanish technology summit, where government officials and industry executives kept circling back to the same point: the infrastructure layers that keep digital services running are becoming as strategically important as the services themselves. It’s a telling detail that even Spain (a market with strong digital momentum, ranking 7th globally in absolute terms in Stanford HAI’s AI Vibrancy Index) is having this conversation. If a country with that level of digital activity is worried about what’s underneath it, the concern clearly isn’t regional. Markets everywhere are racing to scale AI and digital services on infrastructure that, in most cases, wasn’t built to carry that load.
Strip away the policy language, and the question every infrastructure team eventually has to answer is much simpler: what happens when a critical application goes down for five minutes? Usually it’s some combination of lost revenue, a support queue that explodes, and a postmortem meeting nobody wants to be in.
The layer nobody thinks about, until it breaks
Ask someone to describe “digital infrastructure” and they’ll picture data centers, cloud regions, maybe a network diagram. Almost nobody mentions the layer that actually decides whether an application stays up under pressure: Application Delivery infrastructure.
This is the layer distributing traffic across servers, catching failures before users notice them, and standing between an application and an increasingly aggressive threat landscape. It’s the difference between an app that slows down gracefully when traffic spikes and one that simply disappears.
“High availability” used to mean something simpler
For a long time, high availability meant duplicating a server and calling it a day. That’s no longer enough, and most infrastructure teams already know it. Applications now run across hybrid environments, depend on a growing stack of APIs, and have to absorb traffic patterns that look nothing like they did five years ago. That shift demands:
Intelligent load balancing that adapts to real conditions, not static rules
Continuous health checks that catch problems before users do
Automated failover (not a 2 a.m. phone call to whoever’s on call)
Geographic traffic distribution
Layer 7 attack protection
Inspection of encrypted traffic without killing performance
Access policies that adjust dynamically, not once a quarter
In short: resilience today is less about how much hardware you’ve duplicated and more about how intelligently your traffic is actually managed.
The other thing infrastructure teams are tired of: vendor lock-in
There’s a second concern that comes up just as often when teams evaluate new ADC or load balancing platforms, and it has nothing to do with geopolitics: nobody wants to get boxed into a single vendor’s ecosystem. It shows up in almost every procurement conversation questions about licensing structures, “what happens if we need to scale,” whether a core feature is going to suddenly live behind a paywall as an add-on module six months after deployment.
What teams actually want is straightforward: predictable pricing, the freedom to deploy wherever makes sense (on-premise, cloud, hybrid), and a platform that integrates with what they already run instead of forcing them to rebuild around it.
Where the Application Delivery Controller (ADC) comes in
This is the layer where Application Delivery Controllers (ADCs) earn their place. A modern ADC isn’t just a load balancer with a new name, it combines intelligent traffic distribution, high availability, application acceleration, a Web Application Firewall (WAF), DDoS mitigation, SSL/TLS certificate management, API-driven automation, and observability into a single platform.
Bringing all of that into one place cuts down on architectural complexity and the number of things that can fail independently while improving both performance and security. That’s the principle our own platform is built around. SKUDONET Enterprise brings these same core capabilities together, deployable across physical, virtual, cloud, and hybrid environments, without core functionality locked behind extra modules.
Looking ahead
The conversation in the industry is shifting. It’s less about which new technology to adopt next and more about whether what’s underneath can actually hold it up. AI workloads, edge computing, distributed applications; none of it delivers on its promise if the infrastructure underneath buckles the first time it’s under real pressure.
That infrastructure will probably stay invisible to end users. It always has. But for the people on the hook when it fails, it’s the layer that matters most.
That’s not a comfortable thought, but it’s a fair question to ask about your own setup: if your application infrastructure had to absorb a sudden spike, an outage, or an attack tomorrow, how confident are you in the answer?
Find out in two minutes:
Will Your Application Hold Under Pressure? is a short technical assessment that checks how your current setup handles traffic spikes, malicious requests, and unexpected load and where the gaps are likely to show up first.
In 1776, America didn't just reject a king - it rejected tolerance of oppressive governance, taxation without representation, and the idea that power is imposed by someone far away. The Liberty Phone channels the same rebellious spirit for our era, pushing back against Big Tech’s control through a privacy-first, user-owned approach. Use software you can understand, hardware you can shut off, and a system built to give control back to the user that operates it.
Learn more about deepin on DistroWatch: https://distrowatch.com/table.php?distribution=deepin I. June Community Data Overview II. Community Products 1. deepin 25.1.1 Release: Comprehensive Optimization and Security Hardening In June, deepin officially released version 25.1.1, delivering comprehensive upgrades in system security, hardware compatibility, desktop experience, and AI capabilities, including multiple feature improvements and CVE vulnerability fixes. Security Fixes: Fixed high-risk vulnerabilities including curl cookie leak and OpenSSH; simultaneously patched security issues in core components such as systemd, xorg-server, mesa, glibc, rsync, and nginx, enhancing overall security and reliability in network communication, image processing, display services, and other scenarios. Kernel & Hardware Compatibility: Updated 6.18/6.6 kernel components, ...Read more
Dear deepin Users and Community Members, A local privilege escalation vulnerability codenamed ActPedit (also known as pedit COW) has recently been disclosed in the Linux kernel. This vulnerability falls under the same category of page cache write vulnerabilities as the previously disclosed Dirty Frag and Copy Flaws. An attacker with low-privilege local access can exploit this flaw to tamper with the page cache of read-only files, escalate privileges and gain root access. Proof-of-Concept (PoC) codes and detailed exploitation techniques for this vulnerability have been released to the public. Given its high severity and broad impact, we strongly recommend all users ...Read more
The 6th monthly Sparky project and donate report of the 2026: – Linux kernel updated up to 7.1.2, 6.18.37-LTS, 6.12.93-LTS – added to our repos: ZapZap – Sparky 2026.06 & 2026.06 Special Editions released – Linux kernel 7.0.x EOL Many thanks to all of you for supporting our open-source projects. Your donations help keeping them and us alive. Don’t forget to send a small tip in July too…
Update the Linux kernel to 6.12.94, which fixes CVE-2026-43503 (DirtyClone) and CVE-2026-46331 (PACKET_EDIT_MEME),
vulnerabilities that could allow an application in
Tails to gain administration privileges.
For example, if an attacker was able to exploit other unknown security
vulnerabilities in an application included in Tails, they might then use CVE-2026-46331
to take full control of your Tails and deanonymize you.
This attack is unlikely, but could be performed by a strong attacker,
such as a government or a hacking firm. We are not aware of this vulnerability being
used in practice until now.
Welcome back! In our last update, we announced the release of PureOS Crimson! We're thrilled to share this release with you, and we hope you love it as much as we do.
We skipped ahead a little bit in that post, since the release occurred in May and we were eager to share it. We made many more quality-of-life improvements in May leading up to the release. Our work is speeding up too: we're laying the foundation for PureOS Dawn, we just released the Librem 16 featuring PureOS Crimson, and we have many more projects picking up steam!
HTTP/2 has become the default protocol for most production web environments, but managing it at scale still exposes operational gaps that many load balancers struggle to address: inflexible routing, unreliable health checks, inconsistent URL rewriting, and TLS negotiation issues with multi-hosted backends.
We’ve just released SKUDONET Enterprise Edition 10.2.1 to address several of these challenges directly.
This update focuses on three key areas that matter in production: more granular control over HTTP/2 traffic routing, improved reliability across clustered and migrated infrastructures, and a fix for a newly disclosed security vulnerability.
Here’s what’s new and why it’s worth upgrading.
What’s New in SKUDONET Enterprise Edition 10.2.1?
Advanced Layer 7 Routing for HTTP/2 Farms
In complex application delivery architectures, not all HTTP/2 traffic should follow the same path. Different backend services—such as APIs, static assets, and authentication endpoints—often require different routing logic. Until now, achieving this level of granularity in HTTP/2 environments required workarounds.
We’ve added NFMark-based routing policies for HTTP/2 farms. NFMark (network mark) is a Linux kernel mechanism that allows network packets to be tagged and routed according to those tags. This capability is now available directly within the HTTP/2 farm configuration, eliminating the need for external routing layers.
This is especially valuable for organizations running microservices or multi-tenant architectures, where traffic segmentation is a requirement rather than an option.
What does this enable?
Route HTTP/2 traffic to specific backend pools based on request origin or type.
Separate traffic flows for services with different SLA requirements.
Reduce operational complexity in multi-backend HTTP/2 deployments.
Automatic Path Rewrite Handling for Redirects
When an application generates a redirect, it typically includes a Location header pointing to the next URL. In environments where Path Rewrite is enabled, these backend-generated headers may point to internal paths that are inaccessible to end users, resulting in broken redirects.
This no longer requires manual handling. With Path Rewrite enabled on a farm, SKUDONET automatically rewrites Location headers in redirect responses so they point to the correct public URL.
For teams managing applications with complex URL structures or legacy redirect logic, this removes a common source of silent failures.
Improved Cluster Management Interface
A high-availability cluster is only valuable if it’s easy to monitor and manage on a daily basis.
We’ve improved the System Cluster interface so that node status, cluster health, and administrative tasks are now easier to access from a single view.
These improvements are designed to reduce operational friction, with fewer clicks to find relevant information, clearer status indicators, and a more intuitive layout for teams managing multi-node deployments.
Reliability Improvements
Farmguardian Now Fully Supports HTTP/2
Farmguardian is SKUDONET’s built-in health-check engine. It continuously monitors backend server availability and automatically removes failed nodes from the active pool—a critical mechanism for maintaining production uptime.
Until now, Farmguardian’s health-check scripts had limited compatibility with HTTP/2 load balancers.
That integration is now complete. Farmguardian fully supports HTTP/2 farms, ensuring reliable backend monitoring and automatic failover regardless of the protocol in use.
Easier HTTP/2 Farm Migrations
Migrating existing HTTP/2 farms previously required administrators to manually configure routing marks for backends that didn’t already have them.
SKUDONET now automatically detects missing routing marks during migration and configures them without administrator intervention.
This reduces migration risk and helps prevent errors in environments where manual configuration steps can easily be overlooked.
More Reliable Path Rewrite
We’ve fixed an edge case in the Path Rewrite engine that could occasionally introduce unexpected characters into rewritten URLs, resulting in malformed paths that were difficult to diagnose.
URL rewriting is now consistent and predictable across all configurations.
WAF Logs Now Include Request Duration
When the Web Application Firewall (WAF) blocks a request, the log now correctly records the request duration.
Previously, this information was missing from blocked-request log entries, making it more difficult to correlate WAF events with performance data during troubleshooting or security audits.
With accurate request duration logging, security teams can now determine whether blocked requests were also contributing to latency spikes, providing valuable insight when analyzing coordinated attacks or reviewing compliance logs.
SNI Fix for HTTPS Backends (HTTP2TLS Farms)
In environments using virtual-hosted HTTPS backends, where multiple services share the same IP address but are differentiated by hostname, proper Server Name Indication (SNI) handling during the TLS handshake is essential. Without it, backend servers may reject the connection or present the wrong certificate.
We’ve fixed an issue affecting HTTP2TLS farms where the correct SNI value was not always forwarded during the TLS handshake.
This improves compatibility with HTTPS backends and prevents connection failures in environments with multiple virtual hosts behind the load balancer.
Security Update: CVE-2026-44431
This release also includes a fix for CVE-2026-44431, a vulnerability disclosed recently.
We strongly recommend that all Enterprise Edition customers upgrade as soon as possible to keep their platforms protected.
Maintaining an up-to-date patch level remains one of the most effective defenses against known vulnerabilities.
Should I Upgrade?
This release is particularly relevant if:
You manage HTTP/2 farms and need more granular traffic routing.
You use Path Rewrite and have experienced redirect or URL issues.
You manage clustered SKUDONET deployments and want better operational visibility.
You rely on Farmguardian to monitor backends in HTTP/2 environments.
You’re running any version earlier than 10.2.1 (the security patch applies to all Enterprise customers).
If you have an active Enterprise subscription, we recommend planning your upgrade as soon as possible, especially because of the included security fix.
FAQ
What is NFMark-based routing in HTTP/2?
NFMark (network mark) is a Linux kernel feature that assigns tags to network packets. SKUDONET uses these marks in HTTP/2 farms to apply intelligent routing policies, directing traffic to different backends based on predefined rules without requiring additional routing infrastructure.
What does Farmguardian do in SKUDONET?
Farmguardian is SKUDONET’s built-in health-check engine. It continuously monitors backend server availability and automatically removes unhealthy nodes from the active pool, ensuring traffic is sent only to operational servers.
Why is SNI important for HTTPS backends?
SNI (Server Name Indication) is a TLS extension that tells the server which hostname the client is trying to reach during the TLS handshake.
In environments where multiple HTTPS services share the same backend IP address, a missing or incorrect SNI may cause the server to present the wrong certificate or reject the connection altogether.
How do I upgrade to the latest version of SKUDONET Enterprise Edition?
If you have an active Enterprise subscription, you can upgrade through the standard update process.
This week&aposs work centers on a comprehensive CI pipeline overhaul, expanded board and SoC support, and notable U-Boot and kernel modernization across Rockchip platforms.
A substantial portion of the changes target CI infrastructure hardening in the new os-ci-test repository, including self-contained release handling, GHCR authentication via builtin tokens, watchdog-based auto-retry for stalled runs, proxy normalization, and sane build timeouts (60m packages, 30m/60m images). Related fixes in armbian/actions resolve datacenter runner proxy issues, while a rootfs change strips mmdebstrap&aposs apt proxy from shipped images. Codeowners pruning of inactive maintainers and a Docker per-build image tag for parallel builds round out the developer-experience work.
On the platform side, new board and SoC enablement continues with cix-p1 support, Orange Pi 4 Pro (Allwinner A733) community files, and Radxa Dragon Q6A audio, Chromium, and libbpf fixes. RK3506 and RK3506B are now split with proper ROCKUSB_BLOB handling, and Helios4 gains dual-PWM fan control on 6.18. Kernel configurations enable ATH9K_HTC, NFS client across all three kernels, and REALTEK_PHY_HWMON on rockchip64, while an RK3588 I2S MCLK regression is corrected.
U-Boot modernization is broad: rk3308 boards (Rock Pi S, Rock S0) move from v2024.10 to v2026.07 with booti FDT fixes, Khadas VIM3 jumps to v2026.04, and VIM1/VIM2 receive khadas-uboot 0.17.3. The MediaTek Genio and NIO-12L platforms transition to pure mainline v7.1.y with loadaddr fixes for large kernels and initrds, and UEFI builds bump to v7.1 with Phytium dwmac rework.
#Armbian #EmbeddedLinux #Rockchip #UBoot #CI
Changes
(#9400 P2b) Replace echo|pipe subshells with here-strings/parameter expansion. by @iav in armbian/build#9947
As previously announced, Qubes OS User Survey 2026 is currently live! The survey will remain open for two more weeks, until 2026-07-13.
Whether you’re a long-time Qubes user or haven’t even installed it yet, we want to hear about your experiences and about what matters to you. Help us make Qubes the best reasonably secure operating system it can be. If you’ve ever wanted to influence the development of Qubes, now is your chance. Make your voice heard!
There are new iso images of Sparky 2026.06 Special Editions out there: GameOver, Multimedia and Rescue. This release is based on Debian testing “Forky”. The March update of Sparky Special Edition iso images features Linux kernel 7.0.12 (7.1.2 in sparky repos), updated packages from Debian and Sparky testing repos as of June 27, 2026, and most changes introduced at the 2026.06 release.
Effective vulnerability management does not begin and end with scanning. To be effective, vulnerability management requires a solid understanding of both scanner technology and your IT infrastructure. Operationally, vulnerability management depends on having reliable and repeatable processes, well-defined ownership, integration with day-to-day IT operations, and strategic governance. Every organization exists at a different stage of […]
Welcome to the latest Armbian Newsletter: your source for the latest developments, community highlights, and behind-the-scenes updates from the world of open-source ARM and RISC-V computing.
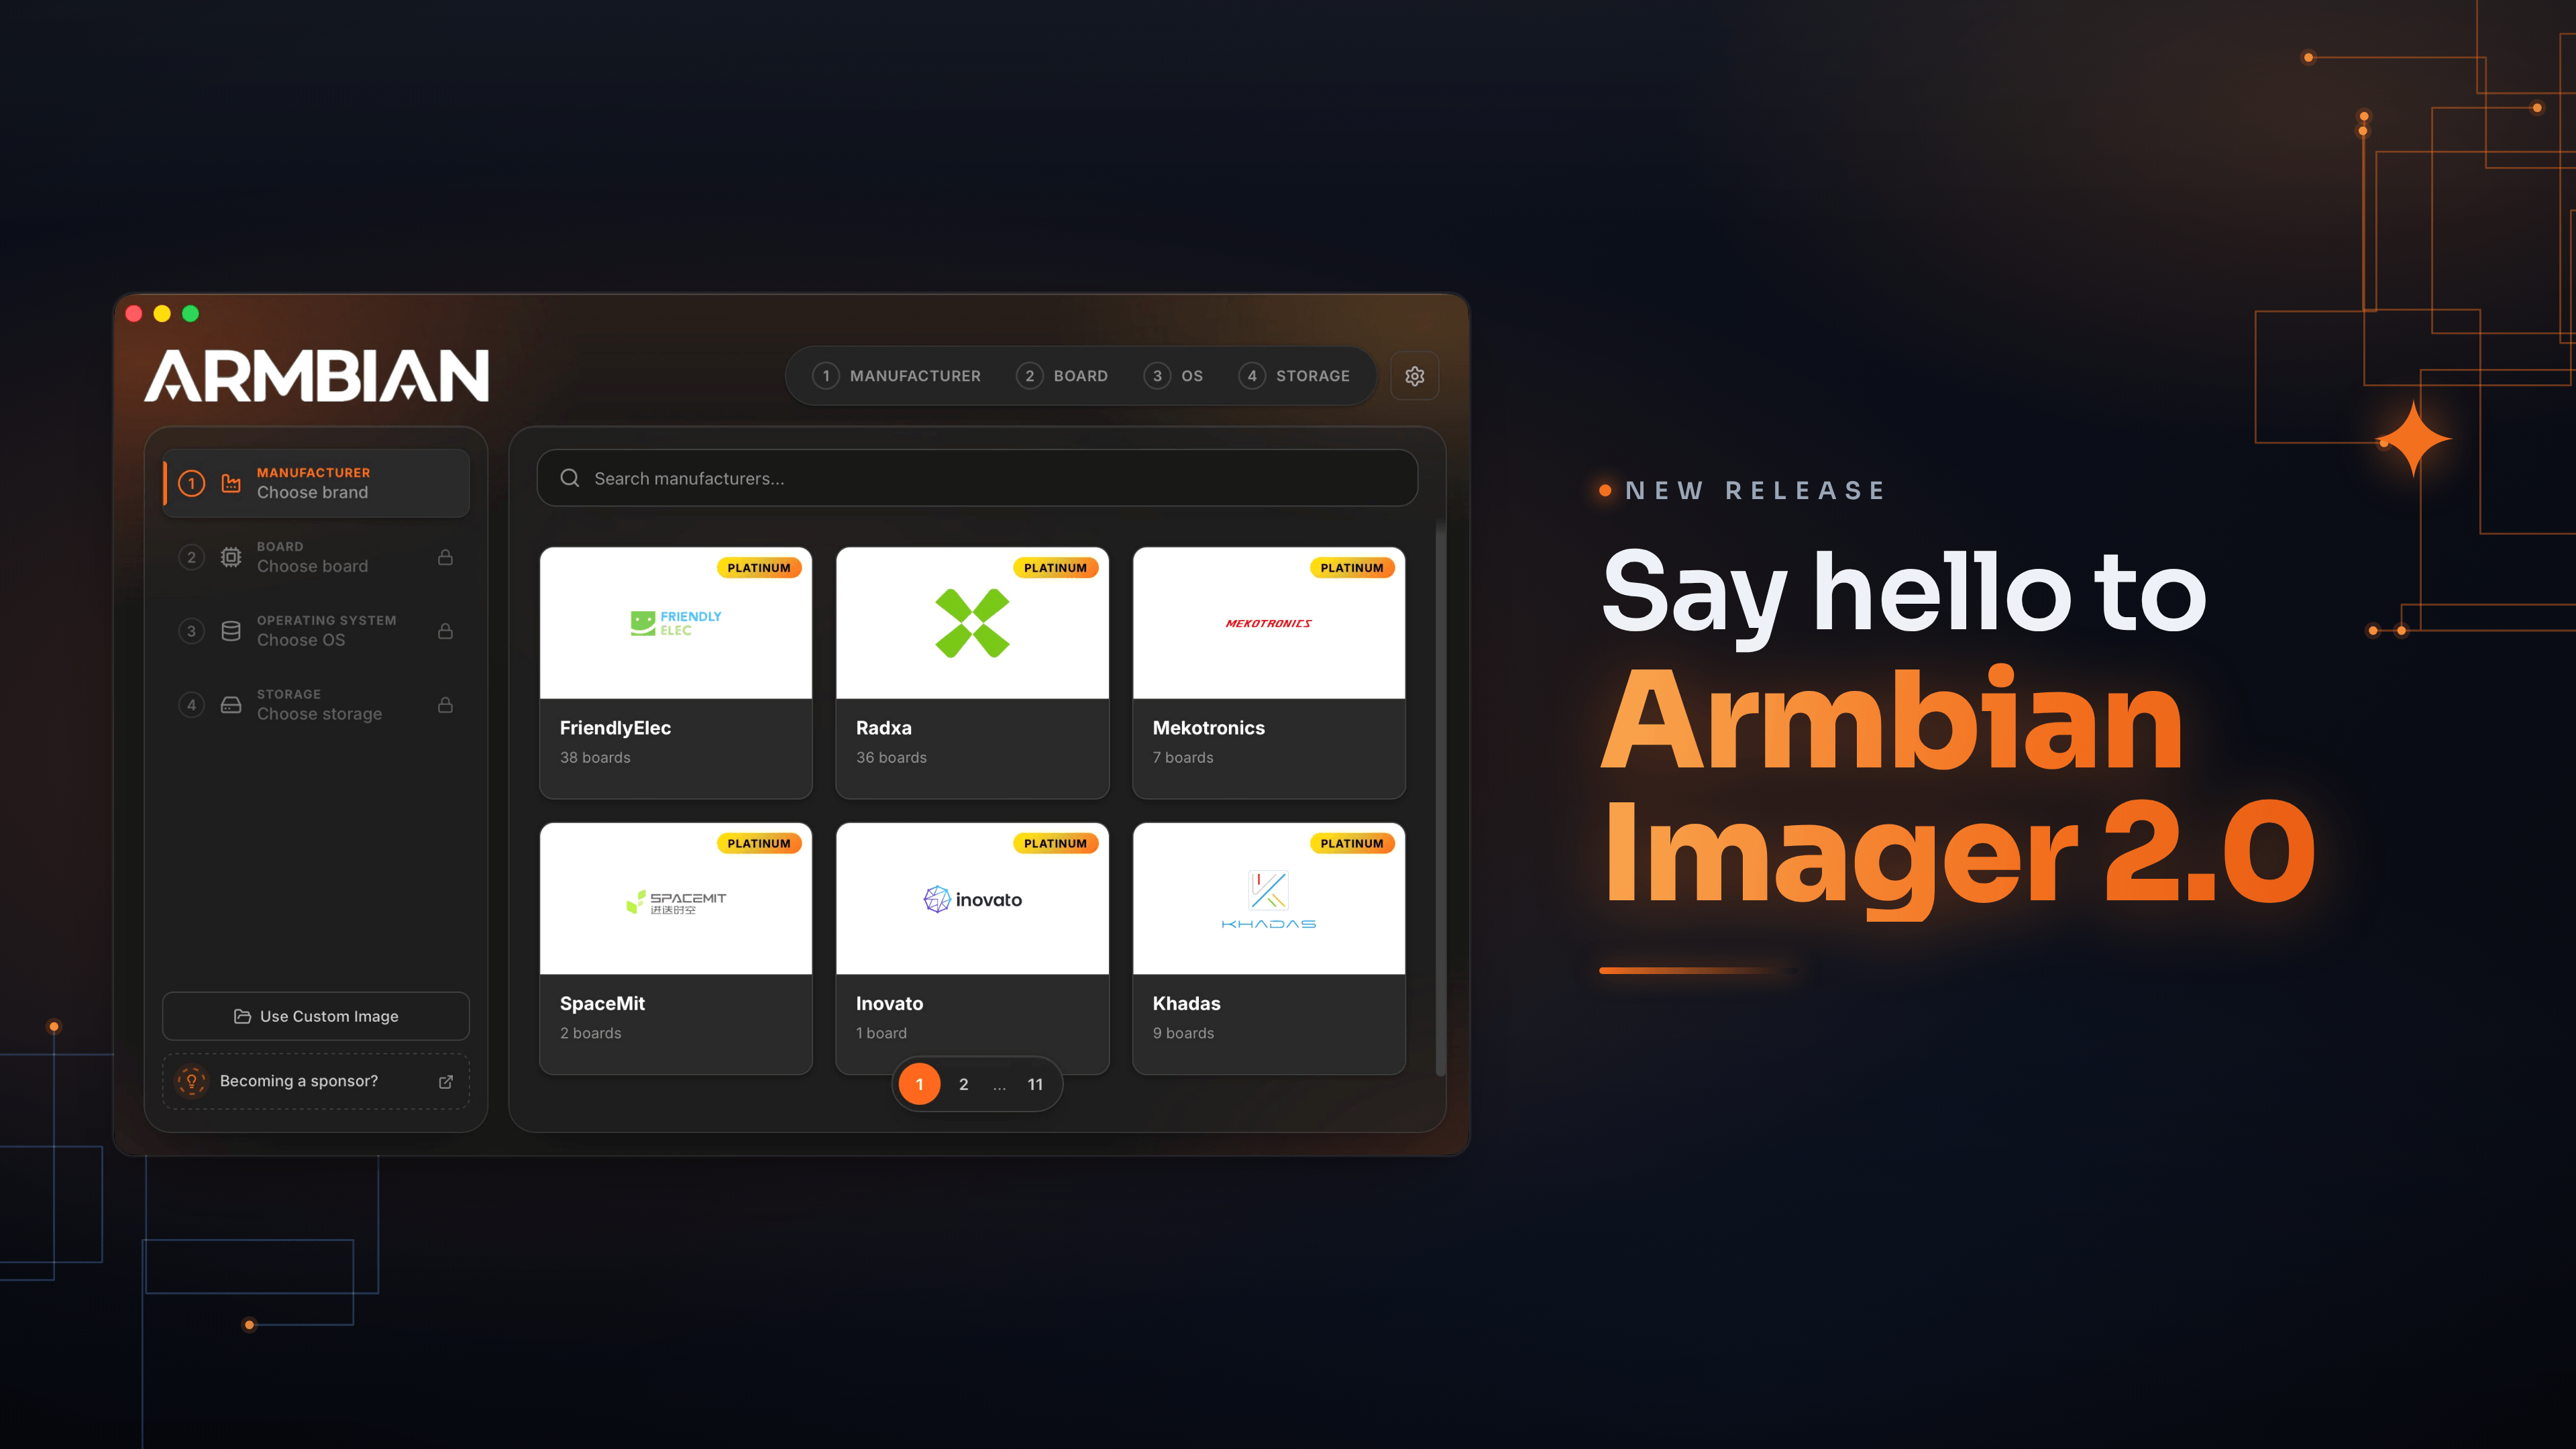
This week: the desktop installer in armbian-config has been rebuilt from the ground up tiered installs, clean uninstalls, and snap-free native browsers across all architectures. Armbian Imager 2.0 is out, rewritten interface and flashing engine, with boards that boot already configured (username, Wi-Fi, timezone) and byte-for-byte write verification. And the NanoPi M5 becomes the first RK3576 board to boot end-to-end from UFS on mainline U-Boot, with no proprietary image in the loop.
SPONSORED
Join us in making open source better! Every donation helps Armbian improve security, performance, and reliability — so everyone can enjoy a solid foundation for their devices.
This week&aposs work centers on board portfolio expansion, kernel and U-Boot version bumps, and CI and infrastructure hardening across the build and documentation pipelines.
Board support saw notable growth with the introduction of the SpacemiT K3 Pico-ITX and Luckfox Nova (RK3308B), alongside a new generic uefi-arm64-dt family and board intended to standardize UEFI device-tree targets. Qualcomm enablement advanced through Radxa Dragon Q6A and Q8B work, including UFS provisioning for Kodiak, EDL-based UFS flashing in the imager, and audioreach topology firmware for sc8280xp. Catalog assets were extended for the MaaXBoard 8ULP, Mellow Fly C5, Xiaomi Sheng, and the new Radxa and SpacemiT boards.
On the kernel and bootloader front, rockchip64, meson64, and rpi4b edge branches were promoted to the stable 7.1 series, with the rtl8192eu driver rebuilt and re-enabled against the new tree. U-Boot was refreshed on cm3588-nas, nanopik2-s905, and the Luckfox Nova, while updated DDR, BL31, and BL32 blobs landed for RK3528 and new SPL loaders were published for RV1103, RV1106, and RK3506. Targeted kernel-config work restored md/RAID modules on sunxi, enabled MIPI DBI panels on sunxi64, and added CPUFreq support for the SpacemiT K1.
Infrastructure changes focused on resilience and resource control. The git-trees workflow gained bounded retries, escalating timeouts, and Google mirror fallbacks; Docker base-image pulls now retry transient GHCR failures and split host dependencies into per-group apt layers. Image compression caps xz memory and thread usage, the info-gatherer no longer exhausts file descriptors, and a new CI policy enforces transparent backgrounds and object-size limits for board and vendor logos, with offending assets re-cropped.
Purism, an independent U.S. technology company dedicated to protecting users’ privacy, security, and online freedom, today announced the launch of its flagship laptop, the Librem 16.
This week&aposs work centers on board portfolio expansion, kernel and U-Boot version bumps, and CI and infrastructure hardening across the build and documentation pipelines.
Board support saw notable growth with the introduction of the SpacemiT K3 Pico-ITX and Luckfox Nova (RK3308B), alongside a new generic uefi-arm64-dt family and board intended to standardize UEFI device-tree targets. Qualcomm enablement advanced through Radxa Dragon Q6A and Q8B work, including UFS provisioning for Kodiak, EDL-based UFS flashing in the imager, and audioreach topology firmware for sc8280xp. Catalog assets were extended for the MaaXBoard 8ULP, Mellow Fly C5, Xiaomi Sheng, and the new Radxa and SpacemiT boards.
On the kernel and bootloader front, rockchip64, meson64, and rpi4b edge branches were promoted to the stable 7.1 series, with the rtl8192eu driver rebuilt and re-enabled against the new tree. U-Boot was refreshed on cm3588-nas, nanopik2-s905, and the Luckfox Nova, while updated DDR, BL31, and BL32 blobs landed for RK3528 and new SPL loaders were published for RV1103, RV1106, and RK3506. Targeted kernel-config work restored md/RAID modules on sunxi, enabled MIPI DBI panels on sunxi64, and added CPUFreq support for the SpacemiT K1.
Infrastructure changes focused on resilience and resource control. The git-trees workflow gained bounded retries, escalating timeouts, and Google mirror fallbacks; Docker base-image pulls now retry transient GHCR failures and split host dependencies into per-group apt layers. Image compression caps xz memory and thread usage, the info-gatherer no longer exhausts file descriptors, and a new CI policy enforces transparent backgrounds and object-size limits for board and vendor logos, with offending assets re-cropped.
As previously announced, the Qubes OS 4.2 release series has officially reached end of life (EOL) as of today, 2026-06-21. We strongly urge all remaining Qubes 4.2 users to upgrade to Qubes 4.3 immediately.
Recommended actions
If you’re already using Qubes 4.3, then you don’t have to do anything. This announcement doesn’t apply to you.
If you’re still using Qubes 4.2, then you should upgrade to Qubes 4.3 as soon as possible. There are two ways to do this:
Perform an in-place upgrade from Qubes 4.2 to Qubes 4.3. Instead of replacing your existing installation, this method involves installing a special command-line tool in dom0, then using it to upgrade your existing Qubes 4.2 installation to Qubes 4.3. This is a more complex multi-stage process, which makes it most suitable for advanced users. This method preserves your qubes and all the customizations you’ve made in dom0 that are compatible with the in-place upgrade process. While not strictly required, we still strongly recommend making a full backup before attempting an in-place upgrade. This way, if anything goes wrong, your data is still safe, and you always have the option of falling back to performing a clean installation.
When an operating system reaches end of life (EOL), it is no longer supported. This means that it will no longer receive security updates, bug fixes, or new features. An OS that does not receive security updates will not be protected against new vulnerabilities, which is why it’s critically important to upgrade to a supported release.
What about patch releases?
The Qubes OS Project uses the semantic versioning standard. Version numbers are written as [major].[minor].[patch]. When a major or minor release reaches EOL, all of its patch releases also reach EOL. In this case, when we say that “Qubes 4.2” (without specifying a [patch] number) has reached EOL, we’re specifying a particular minor release inclusive of all patch releases within it. This means that Qubes 4.2.0, 4.2.1, 4.2.2, 4.2.3, and 4.2.4 have all reached EOL, since they’re all patch releases of the same minor release.
How are EOL dates determined?
According to our release support policy, stable Qubes OS releases are supported for six months after each subsequent major or minor release. This means that the EOL date for Qubes 4.2 was set at the time Qubes 4.3 was released by adding six months to the Qubes 4.3 release date. Qubes 4.3.0 was released on 2025-12-21. Adding six months to this date gives us 2026-06-21, which is Qubes 4.2’s EOL date. Since the EOL date of 4.2 was determined at the time 4.3 was released, we also included this information in the 4.3.0 release announcement.
There are new SparkyLinux 2026.06 ISO images available of the semi-rolling line, codename “Tiamat.” The rolling release is based on the Debian testing “Forky”. Main changes: – Packages updated from Debian and Sparky testing repositories as of June 17, 2026. – Linux kernel 7.0.12 (7.1.0, 6.18.35-LTS, 6.12.93-LTS in Sparky repositories) – Firefox 140.11.0esr (152.0.1…
The CRA’s scope for open-source software (OSS) was one of the most contested parts of the regulation. The OSS community raised legitimate concerns during the legislative process such as how should manufacturer obligations apply to non-commercial, volunteer-driven projects? The final regulation offers an answer, though how convincing that answer is depends on who you ask. […]
We've had a lot of conversations with network architects over the past couple of years, and the same tension comes up almost every time. Businesses need to move faster: spin up new regions, connect to more clouds, and respond to a partner request without a six-week hardware procurement cycle. But they're still carrying the consequences of earlier vendor lock-in decisions and aren't eager to repeat them.
The latest patch-level release of Univention Corporate Server bundles all new features and improvements from the past three months onto new installation media. UCS 5.2-6 brings highlights from Univention Nubus such as a new metrics endpoint for improved observability and technical details for directory objects in the Management UI and additions to the mail stack with alternative mail addresses for groups.
Nubus Metrics
The REST API of the Univention Directory Manager (UDM) now includes a new endpoint that provides metrics about the Nubus deployment. The API has been designed to work best with Prometheus, the most commonly used implementation for collecting and storing metrics and providing them to dashboard solutions such as Grafana.
In the initial release, the metrics endpoint of the UDM REST API provides the following metrics:
Number of registered users
Number of licensed users
Nubus domain name and domain identifiers
Detailed information about the Nubus release, including software version, patch level, and platform information (whether it runs on Kubernetes or UCS)
Operators can easily identify when user growth reaches critical levels, exceeds the license limits, or when the installed software version is outdated. Thanks to the domain information, it is also easy to distinguish between multiple Nubus deployments in larger environments.
Detailed information can be found in the metrics chapter of the Nubus Manual.
Technical Details for UDM Objects in the Management UI
When analyzing configuration issues or end-user incidents, it is often necessary to access technical information used in the backends, such as the Univention Object Identifier. To simplify the process of matching real names with technical identifiers for users, groups, and any other information stored in the directory service, the Management UI now includes a new section with these identifiers.
This is helpful in several scenarios: if a warning or error containing a technical identifier is logged in a backend service, administrators can now search for that identifier directly in the Management UI and easily access the full information about the affected object. If a user reports an issue to the end-user helpdesk, administrators can easily retrieve the technical identifiers and use them to search log messages.
In addition to searchable technical identifiers, further information such as the LDAP DN, timestamps and actors for object creation and last modification, and OpenLDAP internal information such as the entryUUID are available. This information is accessible for every object stored in the directory service, both in the Management UI and via the UDM REST API. As this information is not needed for day-to-day administration, the UI elements are located in the “Advanced settings” section within a new “Technical Information” area.
Alternative Mail Addresses for Groups
Groups managed in Univention Nubus can now have not only a Primary Mail Address but also Alternative Mail Addresses. These can be used to set up mail aliases for groups, following the same concept as Alternative Mail Addresses for users.
The Univention Mail Stack reflects this additional attribute and delivers mails sent to an Alternative Mail Address of a group to all members of that group. This provides administrators with greater flexibility in managing group communication and simplifies the setup of additional contact addresses for teams and departments.
Download and Further Information
UCS 5.2-6 is, as always, available in the download section. Further information about the included changes can be found in the release notes and help article.
This week&aposs work centers on kernel and board enablement, CI infrastructure and caching, and user-facing tooling improvements across the imager and configuration utilities.
On the kernel and board front, Rockchip edge moved to 7.1 and mainline was bumped to 7.1-rc7, while the Raspberry Pi 4B legacy target was re-enabled after a brief revert of the BCM2711 kernel bumps. New board support landed for BeagleBadge and TMDS64EVM (AM64x) on the TI platform, the Anbernic RG DS RK3568 handheld as CSC, and the Youyeetoo YY3588 received a mainline DTS rework with ES8388 audio routing. Several long-standing fixes were merged, including a meson64 GPIO can_sleep regression breaking 1-Wire, JMicron JMB582/JMB585 32-bit DMA forcing, and QRB2210 U-Boot load address corrections.
A substantial CI and caching effort introduces a new git_cdn module providing a GitHub caching git+http proxy, an apt-cacher-ng configng module, and multi-arch Docker images for both. GitHub Actions runners now export per-runner apt, ghcr, ccache, and proxy environments from the NetBox registry, with added retry guards, SSH/rsync timeouts, and workspace ownership reconciliation between jobs. The rootfs builder now routes mmdebstrap through APT_PROXY_ADDR when configured.
User-facing changes focus on the Armbian Imager and first-run experience. The imager gained marquee scrolling for long board names, a "Create new profile" shortcut, accurate progress-phase reporting, and surfaced flash write failures in place of blank error screens. The first-login flow now runs automatically on freshly-flashed boards, and armbian-firstrun uses atomic writes for armbianEnv.txt MAC randomization to prevent corruption.
Yesterday, the US government ordered Anthropic to stop providing its latest AI models – Mythos 5 and Fable 5 – to people without US citizenship. Anthropic then blocked access completely. The explanation: at present, the company cannot reliably determine which users hold which citizenship.
Let that sink in for a moment. Access to a key technology was withdrawn overnight by executive order. No transition period, no choice for the affected companies and public administrations in Europe. To this day, the US government has not provided further details on its security concerns. But for the real lesson, the precise justification is secondary. What matters is the fact that access to critical technology can be taken away from us at any time and without a comprehensible explanation.
Markus Beckedahl from the Center for Digital Rights and Democracy summed it up in an interview with Tagesschau: this is a precedent. It is being enforced through so-called export controls – in the name of a vague notion of “national security.” It affects not only European companies, but even foreign nationals living in the United States, including Anthropic employees without a US passport. We should prepare for the possibility that our entire infrastructure based on American software and hardware could be switched off at any time. That means we need alternatives now in order to become digitally sovereign.
This is about more than mere dependency
Dependency alone is already reason enough to be alarmed. But there is a second aspect that is at least as important: some of the leading AI providers are working with the US government to advocate very strict AI regulation, thereby deliberately making market access more difficult for competitors, especially from the open source ecosystem. This is justified by pointing to the risks of the technology. In practice, however, it is also – at the very least – about securing a competitive advantage and geopolitical dominance in AI.
Even voices close to Silicon Valley read the situation clearly. On the All-In Podcast, David Sacks called it a “regulatory capture campaign based on fear-mongering” – a strategy of regulatory capture built on fear. The mechanism behind it is simple: create fear about the dangers of frontier AI, use that fear to call for strict government regulation, and ultimately benefit from the fact that large, well-capitalized labs can meet such requirements while smaller competitors and open source developers cannot.
The risks of AI are real. The decisive question is not whether safeguards are needed, but where they should apply. If they are placed at the very top, at the level of model access, a small number of licensed labs decide who gains access to knowledge and capabilities. If they are applied further downstream, for example through liability for actual misuse, innovation remains broad-based and verifiable.
Why open source is the real point of contention
The concern that large closed labs have about open source AI is justified – but not for the reasons they publicly state. Open source models are improving rapidly, are significantly cheaper and are coming ever closer to the performance of closed models. That is precisely why they create direct competitive pressure. At the same time, they are also the escape route for all those who cannot work under the restrictions of closed models.
Open source is therefore not a side issue in this debate. If frontier AI is regulated like aviation or pharmaceuticals, a small number of licensed, audited and well-capitalized labs will dominate in the end. If open models remain freely available and continue to improve, innovation, sovereignty and local control will be preserved.
Europe must respond now
Yesterday should be a wake-up call for Europe. We cannot stand by while our public administrations, hospitals, companies and research institutions build on an infrastructure that can be taken away from us with the stroke of a pen. Beckedahl identifies the danger clearly: this is an instrument of power, a means of coercion – and we are exposed to it if we continue to make ourselves completely dependent on a small number of companies headquartered in the United States.
The European Commission has recognized the problem in principle and launched the EU Tech Sovereignty Package on June 3, 2026. But a package on paper is not enough. It remains to be seen whether we are prepared to invest serious money in alternatives based on open standards and designed with encryption in mind from the outset.
This is precisely where open source AI comes in – and precisely why we must build on it now. This is not about closing off markets. It is about sustainably securing this technology for everyone, including Europe. It is about use and cooperation on equal terms, and about full transparency as protection against unwanted influence over public opinion.
The Open Source Business Alliance also warned explicitly today against exactly this pattern: market dominance is used to suddenly and uncompromisingly block access. What began with Microsoft and cloud services is now continuing in AI. Open AI models based on open source cannot be switched off. They offer stable structures and genuine competition that benefits the European software industry. For this to succeed, European providers of digitally sovereign and sustainable AI need support in competing with US providers. Then Europe can catch up and become more innovative itself.
What Europe can do in concrete terms
Europe should use open source AI exclusively in administrative procedures. The state must not bind its core processes to providers that can lock it out at any time.
Europe should create incentives and strengthen competitiveness. One conceivable model would be this: European data centers that offer open source AI while meeting sovereignty and energy sustainability criteria could receive reductions in energy taxes or other benefits that can be passed directly on to prices.
And Europe should directly support open source AI for a transitional period – but in a way that preserves genuine competition between different providers.
Yesterday’s shutdown was an instructive lesson. And it has long since ceased to be only about AI. It is about our entire digital infrastructure. Open source is not Plan B. Open source is the only path that secures sovereignty, transparency and innovation at the same time.
Modern applications generate more traffic, serve more users, and depend on more distributed infrastructure than ever before. Whether you are running a SaaS platform, an e-commerce website, a banking application, or a public API, ensuring traffic reaches the right resources efficiently is critical for performance, availability, and security.
This is where load balancing plays a central role.
However, modern traffic management is no longer just about distributing connections across servers. Organizations increasingly need visibility into application behaviour, real-time traffic control, and integrated security capabilities to support complex digital services.
As a result, one of the most common questions infrastructure teams face is understanding the difference between Layer 4 (L4) and Layer 7 (L7) load balancing.
The answer is not simply a matter of choosing one over the other.
Layer 4 and Layer 7 address different aspects of application delivery. While Layer 4 focuses on fast and efficient traffic distribution at the transport layer, Layer 7 introduces application awareness, enabling advanced routing decisions, security enforcement, and traffic optimization.
In modern architectures, both approaches often work together. Understanding how they complement one another is essential for designing resilient application infrastructures capable of delivering performance, availability, visibility, and security at scale.
Why Modern Applications Require More Than Basic Load Balancing
Ten years ago, many organizations operated relatively simple environments: a web application on a handful of servers behind a basic load balancer distributing incoming connections evenly.
Today’s reality is fundamentally different. Modern infrastructures must support:
Cloud and hybrid deployments
Containerized workloads and Kubernetes environments
Public and private APIs
Microservices architectures
Multi-region applications with continuous traffic growth
Increasingly sophisticated security requirements
As applications become more distributed, traffic management becomes significantly more complex. A load balancer is no longer simply a tool for distributing connections between servers. It has become a critical component of application delivery, helping organizations maintain availability, optimize performance, enforce security policies, and gain visibility into application behaviour.
For some workloads, simple connection-based distribution is sufficient. For others, routing decisions must consider URLs, HTTP headers, SSL certificates, API requests, user sessions, and security policies. This is precisely where the distinction between Layer 4 and Layer 7 load balancing becomes important.
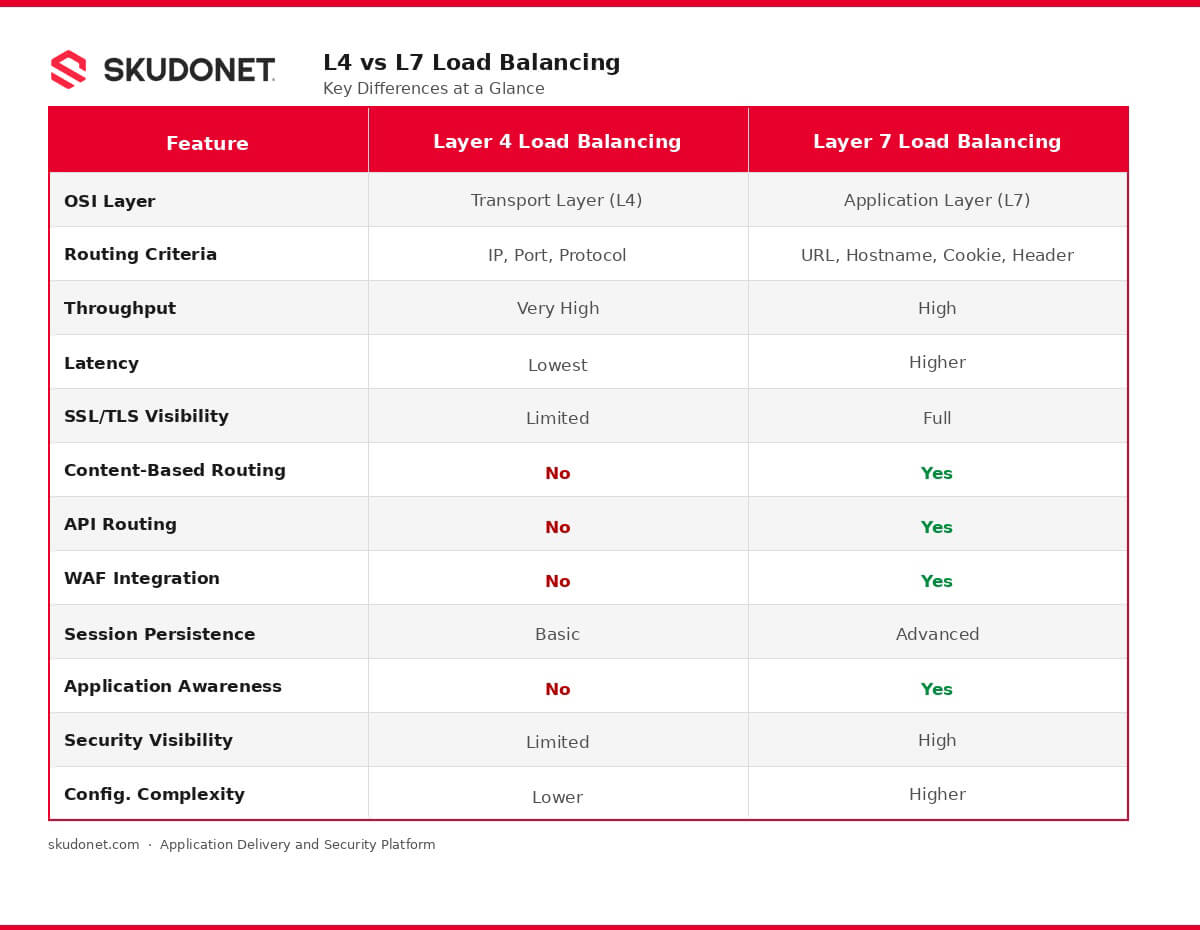
What Is Layer 4 (L4) Load Balancing?
Layer 4 load balancing operates at the Transport Layer of the OSI model. Instead of inspecting application content, it makes routing decisions using network-level information: source IP address, destination IP address, TCP/UDP ports, and protocol type.
When a connection arrives, the load balancer evaluates this information and forwards traffic to an available backend server according to predefined algorithms such as Round Robin, Least Connections, or Weighted Distribution.
Layer 4 load balancing is the fastest approach to traffic distribution. Because it does not inspect packet payloads, routing decisions are made with minimal computational overhead, making it ideal for latency-sensitive workloads processing high volumes of concurrent connections.
Imagine a financial platform processing tens of thousands of encrypted TCP connections per second. The priority is handling traffic efficiently while minimizing latency. In this scenario, Layer 4 load balancing is often the most effective choice.
Where Layer 4 Adds Value
Layer 4 excels when the primary objective is processing large volumes of traffic with the lowest possible latency. Typical use cases include:
DNS services and VoIP platforms
SMTP infrastructure and database traffic
High-volume TCP applications and real-time communication systems
Internal service communication where application-layer inspection adds no value
Advantages of L4 Load Balancing
Extremely high throughput with very low latency
Lower resource consumption and simpler configuration
Broad protocol support and efficient connection handling
Limitations of L4 Load Balancing
Because Layer 4 only understands network and transport information, it cannot:
Route traffic based on URLs or HTTP headers
Apply content-aware policies or understand API requests
Perform application-level security inspection
Integrate natively with WAF functionality
As applications become more sophisticated, these limitations can become significant, particularly for organizations exposing web applications, APIs, and digital services to the Internet.
What Is Layer 7 (L7) Load Balancing?
Layer 7 load balancing operates at the Application Layer of the OSI model. Unlike Layer 4, it understands application protocols such as HTTP, HTTPS, HTTP/2, gRPC, and WebSockets, enabling routing decisions based on application-specific information.
Instead of simply deciding where a connection should go, a Layer 7 load balancer understands what the user is trying to do. For example:
/api/* can be routed to dedicated API server clusters
/images/* can be directed to static content servers
/checkout/* can be forwarded to payment infrastructure
/admin/* can be restricted to administrative service pools
Layer 7 load balancing transforms traffic management from a network function into an application intelligence layer. It enables organizations to route, inspect, and secure traffic based on exactly what each request is trying to accomplish.
Where Layer 7 Becomes Essential
In many modern environments, Layer 7 capabilities are no longer optional. As organizations expose more applications, APIs, and digital services to the Internet, traffic management increasingly requires visibility, security controls, and application awareness. This is why Layer 7 functionality has become a fundamental component of modern Application Delivery and Security architectures.
Typical use cases include web applications, SaaS platforms, REST APIs, e-commerce environments, customer portals, multi-tenant applications, and Zero Trust architectures.
Advantages of L7 Load Balancing
Content-based routing and SSL/TLS termination
Session persistence and API traffic management
Advanced traffic policies and granular access control
Native WAF integration and application-level security visibility
Limitations of L7 Load Balancing
The additional intelligence comes with additional resource requirements. Compared to Layer 4, Layer 7 typically requires more CPU, more memory, more configuration effort, and greater operational expertise. For most modern web applications, however, the operational benefits significantly outweigh the overhead.
Key Differences Between L4 and L7 Load Balancing
The comparison between Layer 4 and Layer 7 is often presented as a choice between performance and functionality. In reality, modern application environments require both.
A useful way to think about it: Layer 4 answers “What connection needs to be delivered?” — Layer 7 answers “What is this request trying to do?” That distinction fundamentally changes what infrastructure teams can achieve.
Why L4 vs L7 Matters in Modern Application Architectures
Very few organizations today operate a single monolithic application running on a handful of servers. Instead, they manage ecosystems composed of APIs, microservices, Kubernetes clusters, cloud-native applications, multi-cloud environments, and distributed services.
Traffic is no longer homogeneous. A single application may include static content, dynamic transactions, authentication services, API gateways, third-party integrations, and internal microservices, each with different performance, availability, and security requirements.
Treating all traffic equally is rarely the optimal approach. Organizations increasingly need visibility into application behaviour so traffic can be routed intelligently, resources can be optimized, and security policies can be enforced consistently.
This is one of the primary reasons why Layer 7 traffic management has become such an important component of modern application delivery strategies.
When to Use L4 vs L7 Load Balancing
The right choice depends on the workload and the operational requirements behind it.
Layer 4 Is Ideal For
DNS infrastructure, VoIP services, and SMTP platforms
Database clusters and high-volume TCP services
Real-time communications where latency is the primary constraint
Internal service traffic where application-layer inspection adds no value
In these scenarios, inspecting application content adds little value while introducing unnecessary computational overhead.
Layer 7 Is Essential For
Modern web applications and customer-facing digital services
APIs and API gateways requiring intelligent routing
SaaS platforms, e-commerce systems, and multi-tenant environments
Applications requiring SSL offloading and session persistence
Deployments requiring WAF protection and application security policies
Environments with advanced routing requirements based on URL, hostname, or header
Organizations that attempt to manage modern web applications with Layer 4 alone frequently encounter architectural limitations as their traffic complexity and security requirements grow.
How Modern ADC Platforms Combine L4 and L7 Traffic Management
For many organizations, the discussion is no longer about choosing between Layer 4 and Layer 7 load balancing. The real challenge is how to combine both capabilities within a unified application delivery strategy.
Modern Application Delivery Controllers (ADCs) integrate Layer 4 traffic distribution, Layer 7 routing, SSL offloading, Web Application Firewall (WAF) protection, reverse proxy functionality, and high availability services into a single platform.
This approach enables infrastructure teams to optimize performance while maintaining the visibility and security controls required by today’s applications. For example, an organization may use Layer 4 load balancing to distribute high-volume TCP traffic efficiently while simultaneously applying Layer 7 policies for API routing, SSL termination, session persistence, and application security.
Why Deployment Flexibility Matters
Not every organization operates exclusively in the public cloud. Financial institutions, healthcare providers, government agencies, and organizations subject to data sovereignty requirements frequently operate on-premise or in hybrid environments where control over infrastructure is not optional — it is a compliance requirement.
For these environments, an ADC that can only be deployed as a SaaS product or cloud service is not a viable option. Organizations need platforms that can be deployed where their infrastructure actually lives: on bare metal servers, virtual machines, private cloud environments, or as part of hybrid architectures spanning both on-premise data centres and cloud providers.
Data sovereignty, regulatory compliance, and operational control are not edge cases. For many European organizations and regulated industries, the ability to deploy security-critical infrastructure on-premise is a fundamental requirement, not an optional feature.
SKUDONET addresses this challenge by combining L4 and L7 traffic management, WAF protection, SSL offloading, and high availability within a single Application Delivery and Security platform available for deployment on hardware appliances, bare metal, virtual machines, cloud environments, and hybrid architectures. This allows infrastructure teams to improve availability, simplify operations, and strengthen application security without deploying multiple disconnected solutions, regardless of where their infrastructure runs.
Beyond Load Balancing: Why Traffic Visibility and Security Matter
For years, load balancing was primarily associated with traffic distribution: prevent servers from becoming overloaded by spreading incoming connections across multiple backend systems.
While traffic distribution remains essential, modern application environments require much more. Today’s organizations must understand how traffic behaves, identify anomalies in real time, detect malicious activity, and maintain visibility across increasingly distributed infrastructures.
A traffic management platform that only distributes requests may help improve scalability, but it provides limited visibility into what is actually happening within the application environment. Modern ADC platforms address this by combining traffic delivery with observability and security capabilities, enabling teams to answer critical operational questions:
Which services are receiving the most traffic?
Are traffic patterns behaving normally?
Is a sudden traffic spike legitimate or an attack?
Which applications are experiencing performance degradation?
Are WAF security policies being triggered?
Security Is No Longer Separate from Traffic Delivery
Historically, organizations deployed multiple independent components to manage traffic and security. A load balancer distributed traffic. A firewall protected the network. A WAF protected web applications. Monitoring platforms provided visibility. While this approach can work, it increases complexity and creates operational silos.
Modern application environments require a more integrated approach. Today, security capabilities (including WAF, SSL/TLS inspection, API protection, DDoS mitigation, and threat detection) are becoming part of the traffic management process itself. This allows organizations to inspect, filter, and control traffic before it reaches critical application resources.
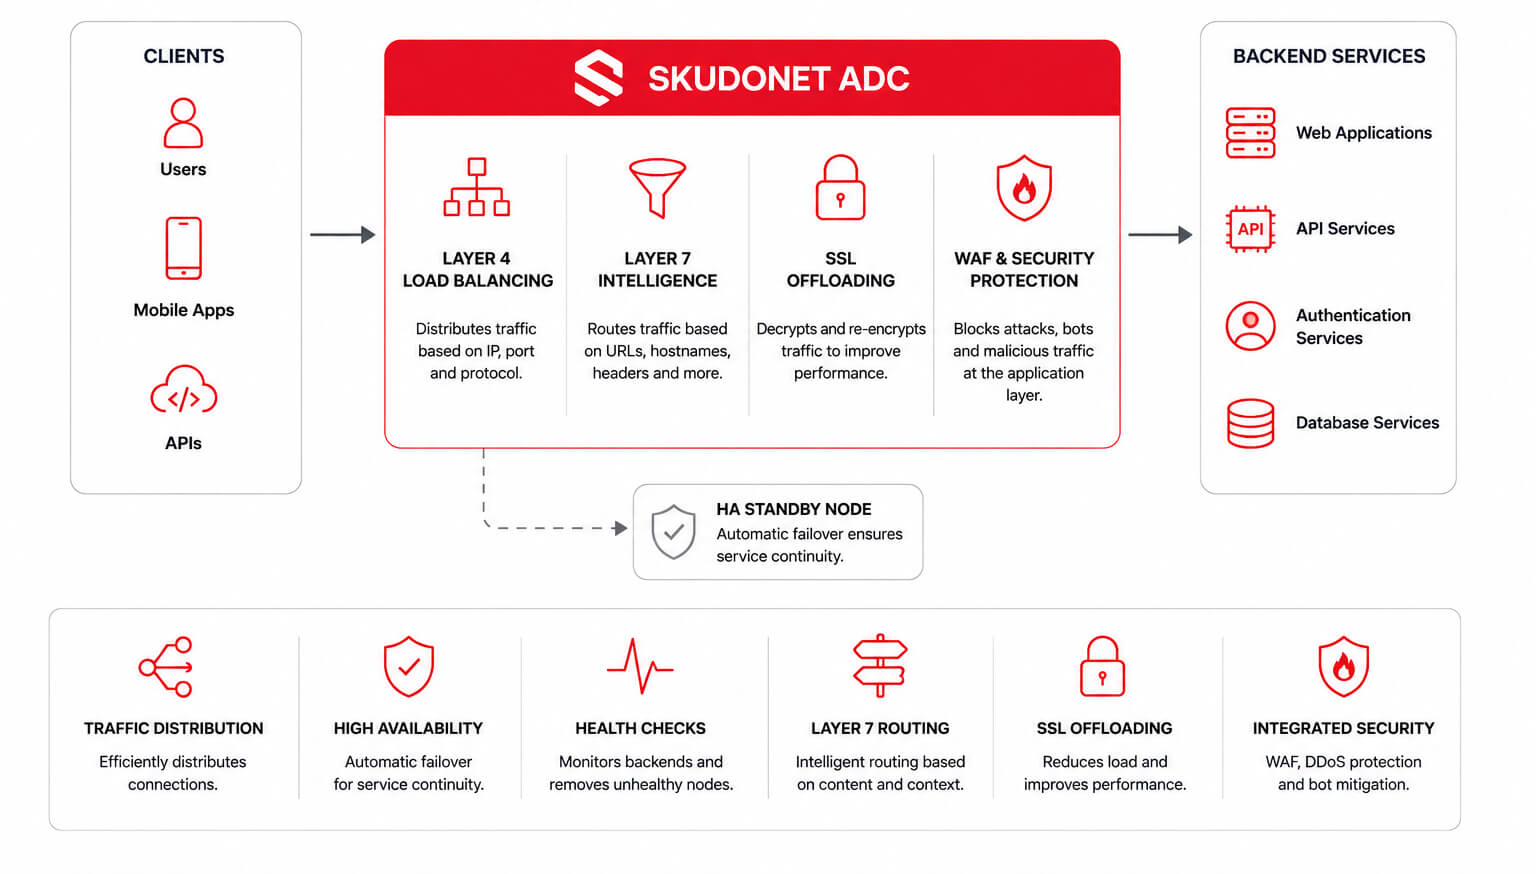
Real-World Architecture Example: Combining L4 and L7 Traffic Management
To understand how Layer 4 and Layer 7 work together in practice, consider a modern SaaS platform serving thousands of users across multiple regions, including web applications, REST APIs, authentication services, internal microservices, and static content delivery.
Figure 1. Example of a modern application delivery architecture combining L4 and L7 traffic management.
In this architecture:
Clients (users, mobile applications, and APIs) send traffic to the ADC.
Layer 4 Load Balancing efficiently distributes connections based on IP, port, and protocol — handling high-volume traffic with minimal latency.
Layer 7 Intelligence routes traffic based on URLs, hostnames, headers, and session context — enabling intelligent routing to the appropriate backend service.
SSL Offloading decrypts and re-encrypts traffic at the ADC layer, reducing backend server load and improving performance.
WAF and Security Protection inspects and filters traffic at the application layer, blocking attacks, bots, and malicious requests before they reach backend systems.
HA Standby Node ensures automatic failover and service continuity, eliminating the ADC itself as a single point of failure.
Backend Services — web applications, APIs, authentication services, and databases — receive only clean, properly routed traffic.
Rather than choosing between Layer 4 performance and Layer 7 visibility, this architecture combines both within a unified platform. Infrastructure teams benefit from high-throughput traffic distribution alongside intelligent routing, integrated security, and operational observability — without deploying multiple disconnected solutions.
Common Mistakes When Choosing Between L4 and L7
One of the most common mistakes is approaching Layer 4 and Layer 7 as competing technologies. In practice, they address different aspects of traffic management and are most effective when used together.
Applying Layer 7 Everywhere Without Justification
Layer 7 provides powerful capabilities, but not every workload requires deep application awareness. Applying Layer 7 inspection to high-volume internal TCP services, database connections, or DNS infrastructure increases complexity and resource consumption without adding operational value. Layer 4 remains the right choice for workloads where latency and throughput are the primary constraints.
Relying Only on Layer 4 for Modern Web Applications
Many organizations initially deploy Layer 4 because it is simple and highly efficient. However, as applications grow in complexity, requirements emerge that Layer 4 alone cannot address: content-based routing, SSL offloading, API management, session persistence, and WAF protection. Organizations that delay the transition to Layer 7 often face significant re-architecture work when security incidents or application growth force the issue.
Treating Security as a Separate Concern
Traffic management decisions are often made with performance as the primary objective, with security controls added later as separate projects with separate tooling. This creates operational complexity, visibility gaps, and inconsistent policy enforcement. Security requirements should be incorporated into the application delivery architecture from the beginning — not retrofitted after the fact.
Ignoring Traffic Visibility Until Something Breaks
Without visibility into traffic behaviour, organizations struggle to identify performance bottlenecks, detect emerging attacks, or troubleshoot application issues under pressure. Visibility into request patterns, error rates, latency metrics, and security events is most valuable when it is always present — not only when something has already gone wrong.
Load Balancing Best Practices
Regardless of whether Layer 4, Layer 7, or a combination of both is used, several principles consistently improve performance, resilience, and operational efficiency.
Design for High Availability from Day One
Load balancers should never become single points of failure. Redundant configurations, active-passive or active-active clustering, and automated failover mechanisms are essential for business-critical services. The ADC layer itself must be as resilient as the applications it protects.
Continuously Monitor Traffic Behaviour
Traffic patterns evolve over time. Continuous monitoring helps organizations identify performance issues, capacity constraints, unusual traffic spikes, and potential security threats before they affect users. Reactive troubleshooting after an incident is significantly more costly than proactive visibility.
Use Health Checks Aggressively
Traffic should only be routed to healthy backend systems. Automated health checks ensure that failed or degraded resources are immediately removed from the active server pool, preventing users from being forwarded to unavailable services.
Integrate Security Early in the Architecture
Security controls are most effective when integrated directly into the application delivery layer rather than deployed as disconnected components added later. WAF protection, SSL inspection, and DDoS mitigation should be part of the initial architecture design, not afterthoughts.
Build for Growth and Changing Requirements
Traffic requirements rarely remain static. Infrastructure decisions should account for future growth, evolving application architectures, new API surface areas, and increasing security requirements. Choose platforms that support flexible scaling without forcing architectural redesigns as requirements change.
Conclusion
The discussion around Layer 4 and Layer 7 load balancing is often framed as a choice between performance and functionality. Modern application environments require both.
Layer 4 remains essential for delivering high-performance traffic distribution with minimal latency. Layer 7 provides the visibility, intelligence, and security controls required by modern web applications, APIs, and digital services.
As applications become more distributed and more exposed to external threats, organizations are increasingly adopting Application Delivery Controller (ADC) platforms that combine both approaches within a unified architecture — alongside SSL offloading, WAF protection, and high availability — rather than assembling disconnected point solutions.
The goal is no longer simply delivering traffic. The goal is delivering traffic efficiently, securely, and with complete visibility into how applications behave.
Explore SKUDONET’s Application Delivery and Security Platform
SKUDONET combines Layer 4 and Layer 7 traffic management, WAF protection, SSL offloading, and high availability within a single platform — available for on-premise, bare metal, virtual machine, cloud, and hybrid deployments.
Unified ADC platform: L4 + L7 + WAF + SSL offloading in one place
Full deployment flexibility: no mandatory cloud dependency
Data sovereignty: designed for regulated and security-sensitive environments
European provider: built for organizations where infrastructure control is non-negotiable
What is the difference between L4 and L7 load balancing? Layer 4 load balancing operates at the Transport Layer, making routing decisions based on IP addresses, ports, and protocols without inspecting application content. Layer 7 operates at the Application Layer, routing traffic based on URLs, HTTP headers, cookies, API paths, and user sessions. L4 prioritizes speed and throughput; L7 enables intelligent routing, security enforcement, and application visibility.
Is Layer 7 load balancing better than Layer 4? Neither is inherently better — they solve different problems. Layer 4 is optimal for high-volume, latency-sensitive workloads such as DNS, VoIP, and database traffic. Layer 7 is essential for web applications, APIs, and services requiring content-based routing, SSL offloading, session persistence, or WAF integration. Most modern architectures use both layers together.
When should a company use a WAF alongside load balancing? A Web Application Firewall (WAF) should be integrated whenever an organization exposes web applications or APIs to the Internet. WAF protection operates at Layer 7 and inspects HTTP/HTTPS traffic for OWASP Top 10 threats, bot activity, injection attacks, and malicious payloads. In modern ADC architectures, WAF functionality is embedded directly into the application delivery layer rather than deployed as a separate appliance.
What is an Application Delivery Controller (ADC)? An Application Delivery Controller (ADC) is a network infrastructure component that combines load balancing, high availability, SSL offloading, reverse proxy functionality, and application security into a single platform. Modern ADCs operate across both Layer 4 and Layer 7, providing traffic distribution, intelligent routing, WAF protection, and traffic visibility. ADCs have largely replaced standalone load balancers in enterprise application delivery architectures.
What are the alternatives to Netscaler or F5 for ADC and load balancing? Organizations evaluating alternatives to Netscaler (now Citrix ADC) or F5 BIG-IP typically consider platforms such as SKUDONET, HAProxy Enterprise, A10 Networks, and Loadbalancer.org. SKUDONET is a European ADC platform that combines L4 and L7 load balancing, WAF protection, SSL offloading, and high availability — with full support for on-premise, bare metal, virtual machine, cloud, and hybrid deployments, making it particularly relevant for organizations with data sovereignty or regulatory requirements.
Do modern ADCs support both Layer 4 and Layer 7 load balancing? Yes. Enterprise ADC platforms combine Layer 4 traffic distribution with Layer 7 routing, security, and visibility capabilities within a single platform. This allows organizations to apply the appropriate traffic management strategy for each workload — high-performance L4 distribution for latency-sensitive services and intelligent L7 policies for web applications and APIs — without deploying separate systems.
Can load balancing improve application security? Yes, particularly when combined with Layer 7 capabilities. At Layer 7, traffic management platforms can integrate WAF protection, perform SSL/TLS inspection, enforce API security policies, detect anomalous traffic patterns, and block malicious requests before they reach backend application servers. Modern ADC platforms treat security as an integral part of the application delivery architecture rather than a separate function.
Whether you’re a long-time Qubes user or haven’t even installed it yet, we want to hear about your experiences and about what matters to you. Help us make Qubes the best reasonably secure operating system it can be. If you’ve ever wanted to influence the development of Qubes, now is your chance. Make your voice heard!
There is a new application available for Sparkers: ZapZap What is ZapZap? Features: – Adaptive light and dark mode – Fullscreen mode – Custom window decorations – Interface scaling adjustment (ideal for 2K/4K screens) – Keyboard shortcuts for main options – Adaptive system tray icon (notifies new messages) – Background process support – Drag-and-drop functionality – Account Grid…
Whether you’re a long-time Qubes user or haven’t even installed it yet, we want to hear about your experiences and about what matters to you. Help us make Qubes the best reasonably secure operating system it can be. If you’ve ever wanted to influence the development of Qubes, now is your chance. Make your voice heard!
We’re pleased to announce the stable release of Qubes OS 4.3.1! This patch release aims to consolidate all the security updates and bug fixes that have occurred since the previous stable release. Our goal is to provide a secure and convenient way for users to install (or reinstall) the latest stable Qubes release with an up-to-date ISO. The ISO and associated verification files are available on the downloads page.
Qubes OS User Survey 2026 is now live! Whether you’re a long-time Qubes user or haven’t even installed it yet, we want to hear about your experiences and about what matters to you. Help us make Qubes the best reasonably secure operating system it can be. The survey takes 10-20 minutes and is fully anonymous. We do not collect any data except for the answers you provide. If you’ve ever wanted to influence the development of Qubes, now is your chance. Make your voice heard!
If you’d like to install Qubes for the first time or perform a clean reinstallation on an existing system, there’s never been a better time to do so! Simply download the Qubes 4.3.1 ISO and follow our installation guide.
If you’re currently on Qubes 4.3 (4.3.0 or 4.3.1-rc1), update normally (which includes upgrading any EOL templates and standalones you might have) in order to make your system essentially equivalent to the stable Qubes 4.3.1 release. No reinstallation or other special action is required.
It’s possible that templates restored in 4.3.1 from a pre-4.3 backup may continue to target their original Qubes OS release repos (#8701). After restoring such templates in 4.3.1, enter the following additional commands in a dom0 terminal:
This will automatically choose the templates that need to be upgraded. The templates will be shut down during this process.
Fresh templates on a clean 4.3.1 installation are not affected. Users who perform an in-place upgrade from 4.2 to 4.3 (instead of restoring templates from a backup) are also not affected, since the in-place upgrade process already includes the above fix in stage 4. For more information, see issue #8701.
The Qubes OS Project uses the semantic versioning standard. Version numbers are written as [major].[minor].[patch]. Hence, we refer to releases that increment the third number as “patch releases.” A patch release does not designate a separate, new major or minor release of Qubes OS. Rather, it designates its respective major or minor release (in this case, 4.3) inclusive of all updates up to a certain point. See our supported releases for a comprehensive list of major and minor releases and our version scheme documentation for more information about how Qubes OS releases are versioned.
Exploitation of vulnerabilities has now emerged as the most common way that attackers gain initial access into an organization’s environment, which underlines the ongoing importance of getting the basics right. Verizon 2026 Data Breach Investigation Report [1] More CVEs, Less Time The industrialization of vulnerability exploitation is not new; the process-driven approach to vulnerability weaponization […]
XSA-493: Only Arm systems are affected. Qubes OS does not run on Arm systems.
XSA-494: Shadow paging is disabled in Qubes OS at build time.
About this announcement
Qubes OS uses the Xen hypervisor as part of its architecture. When the Xen Project publicly discloses a vulnerability in the Xen hypervisor, they issue a notice called a Xen security advisory (XSA). Vulnerabilities in the Xen hypervisor sometimes have security implications for Qubes OS. When they do, we issue a notice called a Qubes security bulletin (QSB). (QSBs are also issued for non-Xen vulnerabilities.) However, QSBs can provide only positive confirmation that certain XSAs do affect the security of Qubes OS. QSBs cannot provide negative confirmation that other XSAs do not affect the security of Qubes OS. Therefore, we also maintain an XSA tracker, which is a comprehensive list of all XSAs publicly disclosed to date, including whether each one affects the security of Qubes OS. When new XSAs are published, we add them to the XSA tracker and publish a notice like this one in order to inform Qubes users that a new batch of XSAs has been released and whether each one affects the security of Qubes OS.
             ---===[ Qubes Security Bulletin 115 ]===---

                              2026-06-09

                 HVM I/O port list traversal (XSA-491)


User action
------------

Continue to update normally [1] in order to receive the security updates
described in the "Patching" section below. No other user action is
required in response to this QSB.

Summary
--------

On 2026-06-09, the Xen Project published XSA-491, "x86 HVM I/O port list
traversal" (CVE-2026-42487) [3]:
| HVM guest I/O port accesses are subject to either emulation or at
| least translation.  Translations are managed by the device model (via
| XEN_DOMCTL_ioport_mapping), and hence the linked list used may changed
| at any time.  Traversal of those lists (while handling guest I/O port
| accesses) therefore needs synchronizing with updates, which was
| missing so far.

Impact
-------

A malicious stub domain can crash the hypervisor (and hence the entire
system). A stub domain is a qube that accompanies a "fully-virtualized"
(HVM) qube and in which QEMU is isolated. Privilege escalation and
information leaks cannot be ruled out.

Affected systems
-----------------

All supported versions of Qubes OS are affected.

Only qubes running in HVM mode are affected. In the default
configuration, this includes sys-net and sys-usb.

Patching
---------

The following packages contain security updates that address the
vulnerabilities described in this bulletin:

  For Qubes 4.2, in dom0:
  - Xen packages, version 4.17.6-6
  For Qubes 4.3, in dom0:
  - Xen packages, version 4.19.4-9

These packages will migrate from the security-testing repository to the
current (stable) repository over the next two weeks after being tested
by the community. [2] Once available, the packages should be installed
via the Qubes Update tool or its command-line equivalents. [1]

Dom0 must be restarted afterward in order for the updates to take
effect.

If you use Anti Evil Maid, you will need to reseal your secret
passphrase to new PCR values, as PCR18+19 will change due to the new Xen
binaries.

Credits
--------

See the original Xen Security Advisory. [3]

References
-----------

[1] https://doc.qubes-os.org/en/latest/user/how-to-guides/how-to-update.html
[2] https://doc.qubes-os.org/en/latest/user/downloading-installing-upgrading/testing.html
[3] https://xenbits.xen.org/xsa/advisory-491.html

--
The Qubes Security Team
https://www.qubes-os.org/security/
The purpose of this announcement is to inform the Qubes community that a new Qubes security bulletin (QSB) has been published.
What is a Qubes security bulletin (QSB)?
A Qubes security bulletin (QSB) is a security announcement issued by the Qubes security team. A QSB typically provides a summary and impact analysis of one or more recently-discovered software vulnerabilities, including details about patching to address them.
Why should I care about QSBs?
QSBs tell you what actions you must take in order to protect yourself from recently-discovered security vulnerabilities. In most cases, security vulnerabilities are addressed by updating normally. However, in some cases, special user action is required. In all cases, the required actions are detailed in QSBs.
What are the PGP signatures that accompany QSBs?
A PGP signature is a cryptographic digital signature made in accordance with the OpenPGP standard. PGP signatures can be cryptographically verified with programs like GNU Privacy Guard (GPG). The Qubes security team cryptographically signs all QSBs so that Qubes users have a reliable way to check whether QSBs are genuine. The only way to be certain that a QSB is authentic is by verifying its PGP signatures.
Why should I care whether a QSB is authentic?
A forged QSB could deceive you into taking actions that adversely affect the security of your Qubes OS system, such as installing malware or making configuration changes that render your system vulnerable to attack. Falsified QSBs could sow fear, uncertainty, and doubt about the security of Qubes OS or the status of the Qubes OS Project.
How do I verify the PGP signatures on a QSB?
The following command-line instructions assume a Linux system with git and gpg installed. (For Windows and Mac options, see OpenPGP software.)
Obtain the Qubes Master Signing Key (QMSK), e.g.:
$gpg --fetch-keys https://keys.qubes-os.org/keys/qubes-master-signing-key.asc
gpg: directory '/home/user/.gnupg' created
gpg: keybox '/home/user/.gnupg/pubring.kbx' created
gpg: requesting key from 'https://keys.qubes-os.org/keys/qubes-master-signing-key.asc'
gpg: /home/user/.gnupg/trustdb.gpg: trustdb created
gpg: key DDFA1A3E36879494: public key "Qubes Master Signing Key" imported
gpg: Total number processed: 1
gpg: imported: 1
View the fingerprint of the PGP key you just imported. (Note: gpg> indicates a prompt inside of the GnuPG program. Type what appears after it when prompted.)
$gpg --edit-key 0x427F11FD0FAA4B080123F01CDDFA1A3E36879494
gpg (GnuPG) 2.2.27;Copyright (C) 2021 Free Software Foundation, Inc.
This is free software: you are free to change and redistribute it.
There is NO WARRANTY, to the extent permitted by law.
pub rsa4096/DDFA1A3E36879494
created: 2010-04-01 expires: never usage: SC
trust: unknown validity: unknown
[ unknown] (1). Qubes Master Signing Key
gpg>fpr
pub rsa4096/DDFA1A3E36879494 2010-04-01 Qubes Master Signing Key
Primary key fingerprint: 427F 11FD 0FAA 4B08 0123 F01C DDFA 1A3E 3687 9494
Important: At this point, you still don’t know whether the key you just imported is the genuine QMSK or a forgery. In order for this entire procedure to provide meaningful security benefits, you must authenticate the QMSK out-of-band. Do not skip this step! The standard method is to obtain the QMSK fingerprint from multiple independent sources in several different ways and check to see whether they match the key you just imported. For more information, see How to import and authenticate the Qubes Master Signing Key.
Tip: After you have authenticated the QMSK out-of-band to your satisfaction, record the QMSK fingerprint in a safe place (or several) so that you don’t have to repeat this step in the future.
Once you are satisfied that you have the genuine QMSK, set its trust level to 5 (“ultimate”), then quit GnuPG with q.
gpg>trust
pub rsa4096/DDFA1A3E36879494
created: 2010-04-01 expires: never usage: SC
trust: unknown validity: unknown
[ unknown] (1). Qubes Master Signing Key
Please decide how far you trust this user to correctly verify other users' keys
(by looking at passports, checking fingerprints from different sources, etc.)
1 = I don't know or won't say
2 = I do NOT trust
3 = I trust marginally
4 = I trust fully
5 = I trust ultimately
m = back to the main menu
Your decision? 5
Do you really want to set this key to ultimate trust? (y/N) y
pub rsa4096/DDFA1A3E36879494
created: 2010-04-01 expires: never usage: SC
trust: ultimate validity: unknown
[ unknown] (1). Qubes Master Signing Key
Please note that the shown key validity is not necessarily correct
unless you restart the program.
gpg>q
Import the included PGP keys. (See our PGP key policies for important information about these keys.)
$gpg --import qubes-secpack/keys/*/*gpg: key 063938BA42CFA724: public key "Marek Marczykowski-Górecki (Qubes OS signing key)" imported
gpg: qubes-secpack/keys/core-devs/retired: read error: Is a directory
gpg: no valid OpenPGP data found.
gpg: key 8C05216CE09C093C: 1 signature not checked due to a missing key
gpg: key 8C05216CE09C093C: public key "HW42 (Qubes Signing Key)" imported
gpg: key DA0434BC706E1FCF: public key "Simon Gaiser (Qubes OS signing key)" imported
gpg: key 8CE137352A019A17: 2 signatures not checked due to missing keys
gpg: key 8CE137352A019A17: public key "Andrew David Wong (Qubes Documentation Signing Key)" imported
gpg: key AAA743B42FBC07A9: public key "Brennan Novak (Qubes Website & Documentation Signing)" imported
gpg: key B6A0BB95CA74A5C3: public key "Joanna Rutkowska (Qubes Documentation Signing Key)" imported
gpg: key F32894BE9684938A: public key "Marek Marczykowski-Górecki (Qubes Documentation Signing Key)" imported
gpg: key 6E7A27B909DAFB92: public key "Hakisho Nukama (Qubes Documentation Signing Key)" imported
gpg: key 485C7504F27D0A72: 1 signature not checked due to a missing key
gpg: key 485C7504F27D0A72: public key "Sven Semmler (Qubes Documentation Signing Key)" imported
gpg: key BB52274595B71262: public key "unman (Qubes Documentation Signing Key)" imported
gpg: key DC2F3678D272F2A8: 1 signature not checked due to a missing key
gpg: key DC2F3678D272F2A8: public key "Wojtek Porczyk (Qubes OS documentation signing key)" imported
gpg: key FD64F4F9E9720C4D: 1 signature not checked due to a missing key
gpg: key FD64F4F9E9720C4D: public key "Zrubi (Qubes Documentation Signing Key)" imported
gpg: key DDFA1A3E36879494: "Qubes Master Signing Key" not changed
gpg: key 1848792F9E2795E9: public key "Qubes OS Release 4 Signing Key" imported
gpg: qubes-secpack/keys/release-keys/retired: read error: Is a directory
gpg: no valid OpenPGP data found.
gpg: key D655A4F21830E06A: public key "Marek Marczykowski-Górecki (Qubes security pack)" imported
gpg: key ACC2602F3F48CB21: public key "Qubes OS Security Team" imported
gpg: qubes-secpack/keys/security-team/retired: read error: Is a directory
gpg: no valid OpenPGP data found.
gpg: key 4AC18DE1112E1490: public key "Simon Gaiser (Qubes Security Pack signing key)" imported
gpg: Total number processed: 17
gpg: imported: 16
gpg: unchanged: 1
gpg: marginals needed: 3 completes needed: 1 trust model: pgp
gpg: depth: 0 valid: 1 signed: 6 trust: 0-, 0q, 0n, 0m, 0f, 1u
gpg: depth: 1 valid: 6 signed: 0 trust: 6-, 0q, 0n, 0m, 0f, 0u
Verify signed Git tags.
$cd qubes-secpack/
$git tag -v`git describe`object 266e14a6fae57c9a91362c9ac784d3a891f4d351
type commit
tag marmarek_sec_266e14a6
tagger Marek Marczykowski-Górecki 1677757924 +0100
Tag for commit 266e14a6fae57c9a91362c9ac784d3a891f4d351
gpg: Signature made Thu 02 Mar 2023 03:52:04 AM PST
gpg: using RSA key 2D1771FE4D767EDC76B089FAD655A4F21830E06A
gpg: Good signature from "Marek Marczykowski-Górecki (Qubes security pack)" [full]
The exact output will differ, but the final line should always start with gpg: Good signature from... followed by an appropriate key. The [full] indicates full trust, which this key inherits in virtue of being validly signed by the QMSK.
Verify PGP signatures, e.g.:
$cd QSBs/
$gpg --verify qsb-087-2022.txt.sig.marmarek qsb-087-2022.txt
gpg: Signature made Wed 23 Nov 2022 04:05:51 AM PST
gpg: using RSA key 2D1771FE4D767EDC76B089FAD655A4F21830E06A
gpg: Good signature from "Marek Marczykowski-Górecki (Qubes security pack)" [full]
$gpg --verify qsb-087-2022.txt.sig.simon qsb-087-2022.txt
gpg: Signature made Wed 23 Nov 2022 03:50:42 AM PST
gpg: using RSA key EA18E7F040C41DDAEFE9AA0F4AC18DE1112E1490
gpg: Good signature from "Simon Gaiser (Qubes Security Pack signing key)" [full]
$cd ../canaries/
$gpg --verify canary-034-2023.txt.sig.marmarek canary-034-2023.txt
gpg: Signature made Thu 02 Mar 2023 03:51:48 AM PST
gpg: using RSA key 2D1771FE4D767EDC76B089FAD655A4F21830E06A
gpg: Good signature from "Marek Marczykowski-Górecki (Qubes security pack)" [full]
$gpg --verify canary-034-2023.txt.sig.simon canary-034-2023.txt
gpg: Signature made Thu 02 Mar 2023 01:47:52 AM PST
gpg: using RSA key EA18E7F040C41DDAEFE9AA0F4AC18DE1112E1490
gpg: Good signature from "Simon Gaiser (Qubes Security Pack signing key)" [full]
Again, the exact output will differ, but the final line of output from each gpg --verify command should always start with gpg: Good signature from... followed by an appropriate key.
For this announcement (QSB-115), the commands are:
You can also verify the signatures directly from this announcement in addition to or instead of verifying the files from the qubes-secpack. Simply copy and paste the QSB-115 text into a plain text file and do the same for both signature files. Then, perform the same authentication steps as listed above, substituting the filenames above with the names of the files you just created.
This week&aposs updates center on new board enablement, Rockchip platform refinements, and tooling and kernel maintenance.
Board support expanded across multiple silicon families, with the addition of Seeed Studio reComputer RK3576/RK3588 DevKits and the Anbernic RG DS handheld image. The EasePi A2/R2 received substantial revisions to its board configurations and device trees, alongside a vendor logo transition to Linkease. SpacemiT K1 boot support was updated, and per-SoC LINUXCONFIG separation was introduced for the TQ family to better isolate kernel configurations.
Rockchip received the bulk of low-level improvements. Notable changes include AUX recovery for USB-C DP Alt Mode in the dw-dp driver, device-tree-based LED configuration for the r8169/r8125 controllers, and an updated patch ensuring stable PCIe Ethernet MAC addresses across many boards. Additional fixes resolve slow WiFi on the NanoPi R76S via SDIO SDR104, enable Bluetooth on the Orange Pi 5 Ultra edge kernel, and restore the tm16xx driver on current kernels.
On the tooling and maintenance side, Armbian Imager 2.0 was released, the mainline kernel was bumped to 7.1-rc6, and the rtl8192eu driver was re-enabled following a cleanup of compilation warnings. A previously merged USB gadget NULL pointer fix was reverted pending further evaluation.
We&aposre releasing Armbian Imager 2.0. We rebuilt the whole thing, the interface and the flashing engine underneath it. The part you&aposll notice first: your board boots already set up. Username, password, Wi-Fi, timezone, language. You tell Imager once, it writes that into the image, and the board comes up configured on first boot. No monitor, no keyboard, none of that blind first login.
Set it up once. It configures itself.
This is the big change in 2.0. You build a profile in settings: username and password, an SSH key, your Wi-Fi network and country code, timezone, locale, shell. Imager writes it straight into the image&aposs filesystem while it flashes. Power on the board, it reads the profile and brings itself up. Qualcomm boards over QDL get the same treatment.
It&aposs the difference between "flash, hook up a screen and keyboard, sit through the setup" and "flash, slot the card, switch on." I didn&apost expect to care this much about it, and now I can&apost flash without it.
Pick everything on one screen
The old pop-up windows are gone. In their place is a single animated flow: manufacturer, board, OS, device, all on one page that moves with you. You page through the board and vendor grids, the distro logos are drawn by hand, and the app glides instead of slamming between screens. Settings got the same redesign. So did the cache manager, which now shows where your gigabytes actually went, by category, and clears them in a tap.
Know what you&aposre writing before you write it
Every image tells you what it is up front: build date, badges for the desktop and the kernel branch, a label when it ships with something preinstalled like the SDK build, openHAB, or Kali. Anything you&aposve already downloaded carries a small check, so you don&apost pull it twice. If you want the trunk rolling releases, there&aposs a filter for them, with a plain warning before you commit. And images that can&apost be written to a card, like the VM disk formats, simply aren&apost in the list.
Every write, checked byte for byte
The download is verified against its SHA256. After writing, the app reads the card back and compares it to the source, byte for byte. While that runs, your board floats over a warm glow that follows the progress, with one line telling you the stage instead of a wall of numbers. When the check turns green, it&aposs because the data on the card matches. Not because we&aposre optimistic.
Bring your own images, online or offline
Have an image of your own? Drop it in. We handle img, iso, xz, gz, bz2, and zst, and decompress before writing. Lose your connection partway through the day and Imager still works: the offline mode was reworked so your cache and your own files stay one click away.
The same app on Mac, Linux, and Windows
Same look and behavior on all three. On Mac it&aposs a single universal build for Intel and Apple Silicon. Pick a light theme, a dark one, or let it follow the system. Eighteen languages, chosen automatically from your locale. Free and open source, the way it started.
Get it
Armbian Imager 2.0 is available now, free, on Mac, Linux, and Windows. It does the same job it always has, writing a good image to a card. The new part is what happens after: you power the board on, and it&aposs already yours.
Time-sensitive This article focuses on the 11 September 2026 vulnerability reporting deadline — the first hard enforcement milestone under the Cyber Resilience Act. As of June 2026, you have approximately 100 days to prepare. Most companies treating the CRA as a 2027 problem are already behind. According to the 2026 CRA Awareness and Readiness Report […]